
Shopping for a new refrigerator is a rare event, most homeowners only replace one every 10 to 15 years. That makes choosing the right model a high-stakes decision, especially when budgets are tight and kitchen layouts leave little room for error. Whirlpool has long been a staple in American kitchens, balancing reliability, capacity, and price in ways that appeal to practical DIYers. In 2026, the brand’s lineup includes several notable upgrades, from energy-efficient compressors to specialized ice-making tech that’s generating buzz. This guide walks through what sets Whirlpool apart this year, which models fit different kitchen configurations, the features worth prioritizing, and how to handle installation without hiring a crew.
Table of Contents
ToggleKey Takeaways
- Whirlpool’s 2026 refrigerator lineup features innovative nugget ice makers and Adaptive Defrost technology that reduces energy consumption by 10–15%, making these new Whirlpool refrigerators more efficient and practical than previous generations.
- French door models like the WRF555SDHZ and WRF757SDHZ offer flexible storage, LED lighting, and spill-proof shelves ideal for families, while top-freezer options provide the lowest cost of ownership for budget-conscious buyers.
- Measure your kitchen space carefully—French door models need at least 42 inches of clearance for full door swing, and standard-depth units protrude 6–8 inches beyond counter depth.
- Energy efficiency significantly impacts lifetime costs; a model using 450 kWh annually saves roughly $234 over 12 years compared to one using 600 kWh.
- DIY installation is achievable with proper prep: level the unit, run water lines carefully (using compression tees over saddle valves when possible), and wait 4 hours before loading food to let refrigerant settle.
- Whirlpool’s nationwide service network and strong parts availability make long-term repairs accessible without factory specialists, a practical advantage for homeowners seeking reliability over a decade of use.
What Makes Whirlpool Refrigerators Stand Out in 2026
Whirlpool’s 2026 lineup leans into practical upgrades rather than gimmicks. The brand introduced its first integrated nugget ice maker this year, a feature previously reserved for high-end brands or standalone countertop units. Nugget ice (sometimes called pellet or Sonic-style ice) is softer and easier to chew than standard cubes, and it’s becoming a sought-after kitchen trend for 2026. This option appears in select French door models and adds about 2 to 3 inches to overall depth, so measure your clearance before committing.
Another standout is Whirlpool’s Adaptive Defrost technology, which monitors compressor runtime and only defrosts when necessary rather than on a fixed timer. This reduces energy consumption by roughly 10 to 15 percent compared to older models, meaningful savings over a decade of use. Pair that with their sixth-sense temperature management system, which uses multiple sensors to maintain consistent cooling zones, and you’ve got a fridge that responds to real-world use patterns instead of guessing.
Whirlpool also offers flexible storage configurations across most models. Adjustable gallon door bins, slide-under shelves, and full-extension humidity-controlled crisper drawers are standard on mid-tier and higher units. For families who stock up at warehouse clubs or preserve garden harvests, these aren’t luxuries, they’re essentials. The bins are robust enough to hold a gallon of milk or a 12-pack without sagging, and the shelves are spill-proof with sealed edges to contain messes.
Finally, Whirlpool maintains a nationwide service network that’s easy to access. Parts availability is strong, and many repairs can be handled by local appliance techs rather than requiring factory-certified specialists. That’s a practical advantage if you’re in a rural area or want to avoid weeks-long wait times for service calls.
Top Whirlpool Refrigerator Models for Homeowners This Year
French Door Models for Modern Kitchens
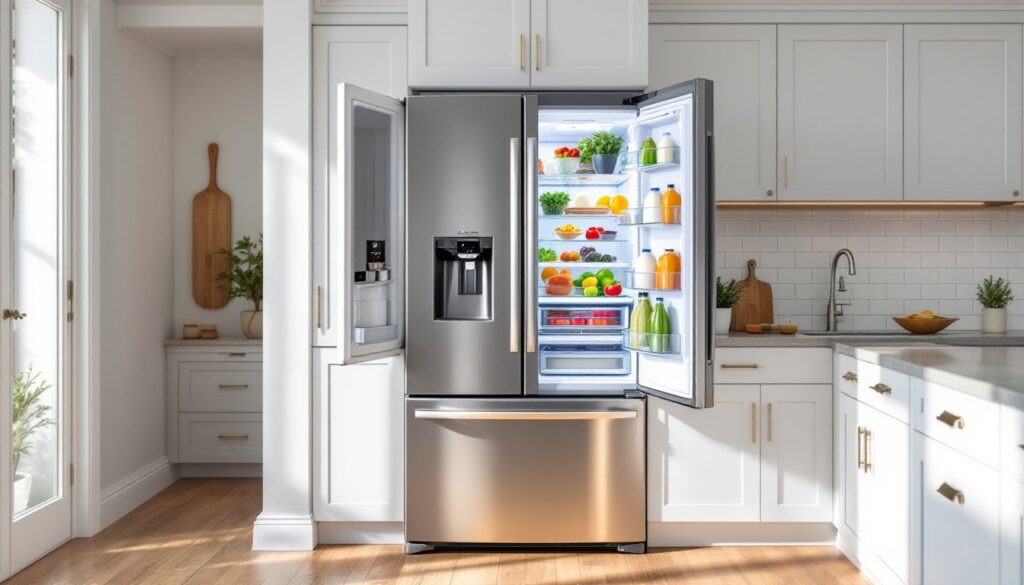
French door refrigerators dominate kitchen remodels because they balance capacity with a smaller footprint. Whirlpool’s WRF555SDHZ (25 cubic feet) is a solid mid-range choice. It features the standard dual evaporators for separate fridge and freezer airflow, LED lighting throughout, and a factory-installed ice maker in the freezer. The exterior dimensions are 36 inches wide by 69.875 inches tall by 35.625 inches deep (without handles), making it compatible with most standard kitchen openings designed for 36-inch-wide counter-depth or standard-depth slots.
For homeowners prioritizing the nugget ice feature, the WRF757SDHZ (27 cubic feet) includes that integrated ice maker along with a door-in-door feature that reduces cold air loss when grabbing frequently used items. This model is standard-depth, which means it protrudes about 6 to 8 inches beyond typical counter depth. If your kitchen layout includes an island or open floor plan, the extra depth usually isn’t an issue. If you’ve got a galley kitchen or tight walkway, measure twice, you’ll need at least 42 inches of clearance for the doors to swing fully open and allow drawer access.
Both models use LED interior lighting with theater-style edge illumination, which makes it easier to spot items in back corners without shadows. The shelves are adjustable glass with Spill Guard edges, meaning minor spills stay contained rather than dripping onto lower shelves or into drawers.
Side-by-Side and Top-Freezer Options
Side-by-side models like the WRS325SDHZ (25 cubic feet) offer narrow door swing, which works well in kitchens where a French door would block adjacent cabinets or appliances. The fridge and freezer compartments are both full-height, so tall items like pizza boxes or celery stalks fit without tilting. The trade-off is less width per compartment, large sheet cakes or party platters won’t fit unless they’re angled.
Top-freezer units remain Whirlpool’s most affordable and energy-efficient category. The WRT518SZFM (18 cubic feet) is a straightforward workhorse: no ice maker, no water dispenser, just reliable cooling with adjustable wire shelves and a pair of crisper drawers. It’s 30 inches wide, which fits older homes with smaller kitchen footprints. Energy usage hovers around 400 kWh per year, roughly half what a comparable side-by-side consumes. If you’re outfitting a rental, garage workshop, or budget kitchen, top-freezer models deliver the lowest total cost of ownership.
For multi-generational homes or kitchens designed for accessibility, French door and side-by-side models position the most-used compartments at eye level, reducing the need to bend or squat. Top-freezer units require more bending for fresh food access but keep frozen items closer to eye level.
Key Features to Look for When Buying Your New Whirlpool
Start with capacity and configuration. Whirlpool sizes range from 18 cubic feet (top-freezer) to 36 cubic feet (premium French door). A family of four typically needs 20 to 25 cubic feet if they shop weekly: larger households or those who meal-prep in bulk should aim for 25 to 30 cubic feet. Check the fresh food versus freezer split, French door models usually allocate about two-thirds to fresh food, while side-by-sides offer closer to a 50/50 split.
Energy efficiency matters over the appliance’s lifespan. Look for the ENERGY STAR label and compare the annual kWh estimate on the yellow EnergyGuide tag. A model using 450 kWh per year at $0.13 per kWh costs roughly $58.50 annually to run: over 12 years, that’s $702. A model using 600 kWh costs $936 over the same period, a $234 difference that often offsets a slightly higher purchase price.
Ice and water dispensers add convenience but also complexity. In-door dispensers free up shelf space but require a dedicated water line (typically 1/4-inch copper or braided stainless). If your kitchen doesn’t have a stub-out behind the fridge location, you’ll need to tap into the nearest cold water supply, doable for a confident DIYer with a saddle valve or compression tee, but it does add installation time. External dispensers also break the door seal slightly, which can reduce overall energy efficiency by 5 to 10 percent.
Humidity-controlled crispers use adjustable vents to regulate airflow. Set the vent open for low humidity (ideal for fruits that release ethylene gas, like apples) and closed for high humidity (leafy greens, herbs). Whirlpool’s two-crisper setup in most models gives you flexibility to separate produce types. Some premium models include a third drawer with a temperature slider for deli meats or beverages.
Adjustable shelving is more useful than it sounds. Slide-under shelves fold up to accommodate tall pitchers or birthday cakes. Full-width shelves are easier to clean than split shelves, but split shelves allow air circulation around items. Whirlpool uses frameless glass shelves in most models, which maximize usable space and wipe clean easily.
Finish options include stainless steel, black stainless, white, and black. Traditional stainless shows fingerprints but matches most appliance suites. Fingerprint-resistant stainless (sometimes labeled as FPSF or smudge-proof) has a micro-textured coating that hides prints and resists streaking, worth the upcharge if you’ve got kids or if the fridge faces high-traffic areas. Be aware that not all stainless is magnetic: if you rely on magnets for shopping lists or kids’ artwork, check product specs before buying.
Installing Your New Whirlpool Refrigerator: A DIY Guide
Refrigerator installation is straightforward if you’ve got the right prep and a second set of hands. Safety first: Unplug the old unit and turn off the water supply valve if it has an ice maker or dispenser. Wear work gloves to protect hands from sharp edges and steel-toe boots if possible, fridges are heavy and corners are unforgiving.
Step 1: Measure the space and the unit. Whirlpool lists dimensions in the product specs, but those are often without handles or hinges. Add 1 inch to width and depth for handle and hinge clearance, then add another inch for airflow behind and above the unit. Most models need at least 1 inch of clearance at the back and top for proper ventilation: skimping here can overheat the compressor and void your warranty. Measure doorways and hallways along the delivery path, too, most 36-inch-wide fridges need at least a 32-inch door opening when angled.
Step 2: Prep the water line (if applicable). If you’re connecting to an existing stub-out, hand-tighten the compression nut onto the 1/4-inch line, then use an adjustable wrench to snug it another half-turn. Don’t overtighten, you’ll crack the ferrule. If you’re running a new line, a braided stainless steel supply line is more flexible and less prone to kinking than copper. Use a saddle valve or compression tee to tap into the nearest cold water pipe (often under the kitchen sink). Saddle valves are faster but can develop slow leaks over time: compression tees require cutting the pipe but offer a more reliable connection. Follow local plumbing codes, some jurisdictions have phased out saddle valves.
Step 3: Move the fridge into position. Use an appliance dolly with straps, not a furniture dolly. Tilt the fridge back slightly so the weight rests on the dolly’s wheels, then roll it carefully. Protect flooring with cardboard or rosin paper if you’ve got hardwood or tile. If you’re working solo, a set of furniture sliders can help nudge the unit into the final few inches, but a helper makes this much safer.
Step 4: Level the unit. Whirlpool fridges have adjustable leveling legs at the front corners. Use a torpedo level on top of the fridge and adjust the legs by turning them clockwise (to raise) or counterclockwise (to lower). A properly leveled fridge ensures doors close on their own and seals stay tight. Aim for a slight backward tilt, about 1/8 inch over the depth of the unit, so doors swing shut naturally.
Step 5: Connect power and water. Plug the unit into a dedicated 115V outlet (most fridges draw 6 to 8 amps, so a 15-amp circuit is adequate, but check your model’s specs). Turn on the water supply and check for leaks at all connection points. Run the ice maker through a full cycle and discard the first batch, new lines can carry manufacturing residue or plastic taste.
Step 6: Let it stabilize. Wait 4 hours before loading food. The refrigerant needs time to settle, especially if the unit was tilted or jostled during delivery. Set the fridge to the manufacturer’s recommended temp (usually 37°F) and the freezer to 0°F. Use a fridge thermometer to verify temps after 24 hours: built-in displays can be off by a few degrees.
Pro tip: Save the original packaging and boxes for at least 30 days in case you need to return or exchange the unit. If you’re in a kitchen remodel workflow, coordinate fridge delivery with countertop or flooring installation to avoid moving it twice.
Conclusion
Whirlpool’s 2026 lineup offers practical upgrades that matter in daily use, better ice, smarter defrost cycles, and flexible storage, without the markup of luxury brands. Match the model to your kitchen footprint, prioritize features that align with how you actually cook and shop, and don’t skip the measuring phase. Installation is manageable for most DIYers if you’ve got help moving the unit and basic plumbing skills for the water line. Once it’s leveled and running, a well-chosen Whirlpool should deliver a decade or more of reliable service.