Open kitchen cabinets, or open shelving, strip away the traditional upper cabinet doors to expose dishes, glassware, and cookware directly to view. This design choice has surged in popularity over the past few years, driven by homeowners seeking a lighter, more accessible kitchen aesthetic. Unlike closed cabinetry, which conceals contents behind solid fronts, open shelving puts everything on display, for better or worse. It’s a practical shift for some, a style statement for others, and a divisive topic in kitchen design circles. This guide walks through what open cabinets are, why they’re trending, the real-world pros and cons, how to style them effectively, and how to convert existing cabinets yourself.
Table of Contents
ToggleKey Takeaways
- Open kitchen cabinets eliminate upper cabinet doors to create a lighter, more spacious aesthetic while improving visual flow and daily access to frequently used dishware and glassware.
- The primary benefits include reduced material costs (20–30% savings on cabinet hardware), faster workflow during meal prep, and display opportunities for collections, though they require disciplined organization to avoid visual clutter.
- Dust and grease accumulation is unavoidable with open shelving, especially near cooktops, so expect regular maintenance and the need to rinse items before use.
- Styling open kitchen cabinets effectively requires grouping like items, limiting color palettes to 2–3 tones, using baskets for small items, and rotating seasonal displays to maintain visual interest.
- Converting existing closed cabinets to open shelving is a manageable DIY project taking 4–8 hours per cabinet run, involving door removal, hole filling, refinishing, and adding support brackets if needed.
- Open shelving works best in smaller kitchens or for design-conscious homeowners; traditional buyers and families with young children or pets may view it as impractical or a design downgrade.
What Are Open Kitchen Cabinets and Why Are They Trending?
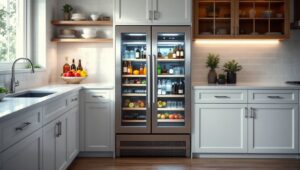
Open kitchen cabinets replace traditional upper cabinet doors with exposed shelving, either by removing doors entirely or installing purpose-built open shelves. The shelves themselves are typically 12 to 16 inches deep, matching standard upper cabinet dimensions, and made from solid wood, plywood, or metal brackets with wood or glass surfaces.
The trend traces back to farmhouse and industrial design movements, where open shelving reinforced a utilitarian, lived-in vibe. In 2026, the appeal has broadened. Homeowners cite improved visual flow in smaller kitchens, easier access to everyday items, and a reduction in the visual weight that banks of upper cabinets create.
Design-forward platforms like The Kitchn and renovation blogs have amplified the style, showcasing galleries where white dishware and glassware create minimalist focal points. Accessibility also drives adoption: no more fumbling with cabinet doors when hands are full, and no hinges or soft-close mechanisms to maintain or replace.
That said, the trend isn’t universal. Open shelving works best in kitchens with disciplined organization and a tolerance for visible contents. It’s less a one-size-fits-all solution and more a deliberate design choice that fits specific lifestyles and aesthetics.
Benefits of Open Kitchen Cabinets for Your Home
Open cabinets deliver tangible advantages, especially in smaller or older kitchens where closed upper cabinets can make spaces feel cramped.
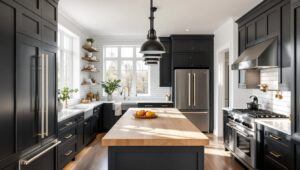
Visual openness is the most immediate benefit. Removing door fronts eliminates the upper “wall” of cabinetry, making kitchens feel taller and more spacious. In galley or U-shaped layouts where wall space is limited, this shift can meaningfully improve sightlines and natural light flow.
Faster access to everyday dishes, glasses, and mugs streamlines kitchen workflow. There’s no need to open and close doors multiple times during meal prep or cleanup. For households that cook frequently, this cuts seconds off repetitive tasks, which adds up over years of use.
Lower material cost is a practical upside for renovations or new builds. Cabinet doors, hinges, and soft-close hardware can represent 20–30% of total cabinet costs. Eliminating doors reduces both material and labor expenses, freeing budget for higher-quality countertops, backsplashes, or appliances.
Display opportunities let homeowners showcase heirloom dishware, colorful ceramics, or glassware collections. When styled intentionally, open shelves double as functional decor, adding personality that closed cabinets hide.
Easier cleaning and maintenance is often overlooked. Without door fronts, there are no grease-streaked panels to wipe down, no hinges to adjust, and no hardware to tighten. Dusting shelves and contents is straightforward, though it does need to happen more often than with closed cabinets.
Potential Drawbacks to Consider Before Going Open
Open shelving isn’t without compromises. Before committing, weigh these practical realities.
Dust and grease accumulation is unavoidable. Dishes, bowls, and glassware will collect airborne grease particles from cooking, especially if shelves are positioned near the range or cooktop. Expect to rinse or wipe down items before use, particularly in kitchens with heavy frying or sautéing. Weekly dusting becomes part of the routine.
Visual clutter is the most common complaint. Everything is on display, which means mismatched mugs, chipped plates, or everyday clutter can undermine the aesthetic. Homeowners who prefer a clean, minimalist look need to commit to curation and regular tidying. If that feels like a chore rather than a design choice, closed cabinets may be a better fit.
Limited storage capacity can be a dealbreaker in smaller kitchens. Open shelves typically hold fewer items than closed cabinets because of the need for visual breathing room. Stacking items too densely defeats the design purpose and creates a cramped, cluttered appearance. Households with large dish collections or bulk pantry storage may struggle to accommodate everything without supplemental cabinetry elsewhere.
Noise and fragility increase when glassware and dishware sit exposed. Shelves near high-traffic zones risk accidental bumps, and items are more vulnerable to breakage during routine use. Homes with young children or pets may find open shelving impractical in the short term.
Resale considerations vary by market. While open shelving appeals to design-conscious buyers, some traditional buyers view it as a downgrade or incomplete kitchen. In competitive markets, it’s worth consulting a local realtor before making permanent structural changes.
How to Style Open Kitchen Cabinets Like a Pro
Styling open shelving requires intention. The goal is functional storage that doubles as visual interest, not a chaotic jumble of mismatched items.
Organizing Tips for Clutter-Free Open Shelving
Start by grouping like items together. Stack plates by size, cluster mugs on one shelf, and dedicate a section to glassware. This creates visual rhythm and makes retrieval intuitive.
Limit color palettes to two or three tones. White, cream, and light gray dishware creates a cohesive, airy look, while bold accent pieces (a single row of cobalt blue bowls, for example) add controlled pops of color. Avoid mixing too many patterns or hues, which reads as cluttered even when neatly arranged.
Use baskets or bins for small or irregular items like tea bags, napkins, or utensils. Woven baskets or matte ceramic containers add texture while concealing visual noise. Label bins if the kitchen is shared by multiple people.
Vary heights and depths to create dimension. Place taller items like pitchers or vases at the back or ends of shelves, with shorter stacks in front. Leave 2–3 inches of vertical clearance between shelf contents and the next shelf up to avoid a cramped appearance.
Rotate seasonally to keep displays fresh. Swap out heavier stoneware for lighter glassware in summer, or feature holiday-specific serveware during celebrations. Many open kitchen cabinet designs incorporate this principle to maintain visual interest year-round.
Best Types of Kitchen Items to Display
Some items naturally suit open shelving, while others are better kept behind closed doors.
Everyday dishware, dinner plates, salad plates, bowls, and mugs, should occupy prime real estate. These are accessed most frequently, so convenience justifies the visibility.
Glassware looks clean and uniform on open shelves, especially stemware or matching tumblers. Avoid plastic cups or mismatched promotional glassware, which cheapens the aesthetic.
Cookbooks add color and personality when spine-out or stacked horizontally. Mix in a small plant or decorative object for balance. Keep cookbooks you actually reference: dust-covered volumes undermine the curated look.
Serving pieces, platters, cake stands, or pitchers, work well as occasional accent pieces. Reserve one shelf or section for these, rotating them as needed.
Pantry staples in matching containers can suit open shelving if stored in uniform glass jars or canisters. Flour, sugar, pasta, and grains look intentional when decanted and labeled. Skip storing original packaging or bulk bags, which creates visual chaos.
Avoid storing infrequently used items, chipped or stained dishware, plastic storage containers, or anything you wouldn’t want guests to see. Those belong in closed lower cabinets, a pantry, or a utility closet.
DIY Conversion: Transforming Closed Cabinets to Open Shelving
Converting existing upper cabinets to open shelving is a straightforward DIY project for most homeowners with basic carpentry skills. The process typically takes 4–8 hours per cabinet run, depending on finish work.
Tools needed:
- Cordless drill/driver
- Screwdriver set (Phillips and flathead)
- Pry bar or putty knife
- Wood filler and putty knife
- Sandpaper (120-grit and 220-grit)
- Primer and paint or stain (matching existing finish)
- Level (2-foot or laser)
- Safety glasses and dust mask
Materials:
- Wood filler or spackle
- Touch-up paint or stain
- (Optional) new shelf brackets if reinforcing
Step-by-step process:
-
Empty cabinets completely and remove all contents. Protect countertops below with drop cloths or cardboard.
-
Remove cabinet doors. Open doors fully, then unscrew hinges from the cabinet frame (not the door). Most hinges use two to three screws per hinge, typically euro-style concealed hinges or exposed butt hinges. Label doors and hardware if you’re storing them for potential reinstallation later.
-
Remove hinge plates and hardware. Unscrew any remaining hinge mounting plates from the cabinet interior. If the cabinet has a center stile (vertical frame piece between doors), consider whether to leave it or remove it. Removing the stile opens up the shelf width but may require additional support depending on span. Consult examples on Remodelista’s open kitchen shelves gallery for design reference.
-
Fill screw holes and damaged areas. Apply wood filler to all hinge screw holes, gouges, or dents on the cabinet face frame. Overfill slightly, then let dry per manufacturer instructions (usually 30–60 minutes). Sand flush with 120-grit sandpaper, then finish-sand with 220-grit.
-
Prime and paint or stain. If the cabinet interior or face frame needs refinishing, apply one coat of primer (oil-based for stain-blocking if covering knots or discoloration), then two coats of paint or stain to match existing finishes. Allow proper dry time between coats, 2–4 hours for latex paint, 6–8 hours for oil-based.
-
Inspect shelf support. Most cabinet shelves rest on adjustable shelf pins or dados (routed grooves). If shelves feel flimsy after door removal, add L-brackets or floating shelf brackets secured to wall studs for added support, especially for shelves holding heavy dishware. Use a stud finder and 3-inch wood screws into studs for maximum load capacity.
-
Clean and style. Wipe down shelves, vacuum any sawdust, and begin arranging items per the styling tips above.
Safety and code notes: This is cosmetic work and doesn’t typically require permits. But, if you’re removing structural elements (like a full stile or altering cabinet boxes), consult local building codes or a professional to ensure you’re not compromising wall or cabinet integrity. Always wear safety glasses when drilling or sanding, and use a dust mask during sanding to avoid inhaling fine particulates.
Alternative approach: If full door removal feels too permanent, consider removing only the door panels and leaving frames in place for a glass-front or open-frame look. This preserves some structure while opening up visibility. It requires more precision cutting and finishing, so assess your skill level honestly before committing.